 |
Materials:
- Pre-made Paper cranes (I will be doing another post on how to fold paper cranes so don't worry if you don't know how to yet!)
- Needle
- Thread
- Tape
Steps:
1. Start off by choosing the right color thread! I decided to go with a light color that would kind of blend into the walls. But if you want it to really pop, choose a bright color! Thread your needle and tie a knot on the end. Make sure your thread is pretty long, especially if you have high ceilings!
2. Once you have your first knot, add a paper crane by threading your needle through the middle of the crane. Leave an inch or so (depending on how you want to space out your cranes - I did 2 inches... otherwise they'd just fall on top of each other) and tie another knot before threading yet another crane.
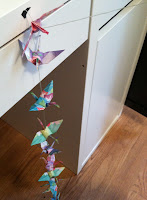
3. Keep repeating this concept over and over again until you have a nice string of paper cranes. See how the knots separate them a little?
Tape your string of cranes to the ceiling and... you're done!
What I've learned:
- Count the number of cranes you have a divide them up evenly into groups before you start. Having a plan helps!
- Try your best to space them as evenly as possible. It's not a big deal if you're off though!
- In one of the pictures above I taped my string of cranes to a desk, the longer it gets the easier it is to get them tangled up. Anchoring them will help!
I ended up making 5 strings of paper cranes with 17 cranes on each! Some of them ended up longer than the others (since I didn't do a great job of spacing) but I kind of found a way to make them work. This was fun way to liven up this wall and I hope some of you try it out!
You can do it too!
Alison :)


No comments:
Post a Comment