Wednesday, October 31, 2012

Bobby Pin Organization

Hey every-bobby! I just recently learned about this cool bobby pin organization trick and I've been so excited to show you! If you're like me and lose your bobby pins all the time, here's a great way to keep them in one place.

Materials:
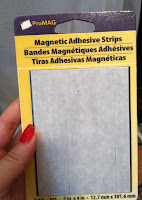
- Magnetic Adhesive strips
- Flat surface
- Bobby pins

I love this idea because it keeps your bobby pins right there! So useful when you go to grab one while doing your hair.


Steps:

1. Get your magnets and test it out! Even when I hold the magnet strip upside down the bobby pins still stay on. If, for some reason yours don't stick too well.... I would (in the next steps) use 2 strips side-by-side, to make sure the bobby pins stay in place.


2. Peel back the adhesive paper and firmly press it onto your "flat surface". I chose to stick it on the inside of my wardrobe (honestly it's a bookshelf with doors that I put clothes, shoes, and accessories into). I know other people have used this in their medicine cabinets and on the inside of drawers too. Put yours close to where you usually get ready in the morning!


Here's how it turned out!  ----------------------------->
(I used flash so you can see better... made the picture look kind of weird though!)


What I've learned:

- Make sure to buy magnets with adhesive!
- You can use this same trick multiple times as long as you have more magnet strips and bobby pins.


This is so easy and I'm so excited to have a spot just for bobby pins. Obviously, we all probably have a whole lot more bobby pins but at least we'll have a few out and ready for everyday hairstyles. You won't have to go digging around for them anymore! Maybe this post will be able to save a few bobby pins?

Thanks for bobbin' by! (too cheesy?)

Alison :)

Tuesday, October 30, 2012

Grow your own Scallions

Hey everyone! This is going to be a super quick post that I just started a little while ago! By no means do I have a "green-thumb", so I am attempting to try and do more gardening projects. Ideally I would be able to grow plants that are not only pretty but are edible! I'm starting off very, very slow by growing my own scallions!

Materials:
- Store bought Scallion                                    
- Cutting board                                               You can add scallions to practically anything!
- Knife
- Dish
- Water

 Steps:

1. Cut about an inch of the original (store bought) scallion with the roots.


2. Get a small dish with some water and place the scallion root in it.


3. Keep an eye for how thirsty your scallion is and water it accordingly! You can see how much it'll grow in just a few days!


What I've learned:

- I can grow plants!
- Do not keep your scallion in direct sunlight for too long, it will dry out the water and the plant.


I hope you liked this short post. I had a great time eating the "fruits of my labor", especially when it was so easy to grow my own scallion. Still, it was a great feeling! The best part is that I can still grow more from the same root as long as I don't cut too much off. So the next time you have potatoes, with sour cream and a bit of shredded cheese, add some of your home grown scallions!

Yummers,

Alison


Monday, October 29, 2012

Halloween Nail Design

Hey guys! In the spirit of Halloween I thought I'd try a fun nail design! I decided to do a "scar/stitch" design as an accent for my nails! I am definitely a beginner when it comes to nails but for those of you want to try something festive and easy to do, keep reading!

Materials:
- Nail polish (Red, Silver)
- Toothpick

Steps:

1. First, paint your base color! I used Sally Hansen's Xtreme Wear in Cherry Red. I painted 2 coats to (hopefully) prevent chipping. Let your nails dry completely before the next step!


2. Get your toothpick and a silver nail polish. You could also use a black nail polish for a more dramatic look. I used Petites in Twilight (which happens to be a favorite nail polish of mine)! Take your toothpick and dip it into the silver nail polish bottle, just to get a little of the color. Now use the toothpick to draw a diagonal line across your ring finger nail.


3. To continue with this "scar/stitch" look, add smaller "stitches" across the first diagonal line.


Here's the final look!


What I've learned:

If you get too much nail polish on your toothpick it'll glob onto your nail so just skim it along the edge of the bottle to wipe a bit off. 

Hope you enjoyed this tutorial and that you get a chance to try it before Halloween! I had a lot of fun trying this out and I really like how it came out. I'm actually going to be a vampire this year so the red nails are definitely going to stand out on against a dark costume! 

BOO!

Alison


Wednesday, October 17, 2012

Tiny Button Present

Hey everyone! I'm sorry that I haven't posted anything in so long! So... I'm going to try and make it up to you with this Tiny Button Present post! I made this for my boyfriend awhile ago as a cheesy/cute/silly gift but I couldn't post it until after he found it, since it was a surprise! This is going to be dedicated to everyone trying to make a long distance relationship work! I hope you like it. ^.^

Materials:
- Lined paper
- Scrapbook paper
- Scissors
- Button
- Writing Utensil
- Glue 

This is just a list of what I used, but use whatever you have at home already, I know I did! (Notice my scrapbook paper is a piece from my It's A Boy Card!)


Steps:

1. Cut a rectangular piece of scrapbook paper. The dimensions will vary based on the size you want your box to be, but I recommend having the length to be significantly longer than the width. You need to make 3 small "cuts" on each side, not including cutting out a flap shape for the top of your box. The middle cuts are closer together on mine, and that will be the "back-side" of my box. (Insert funny joke about butt. hehe)


2.  Now fold your sides together, using your "cuts" as guidelines. When you fold each little flap in add a dab of glue, except for the "top" of your box. Just fold the flaps into the box to close it.


3. Great! Now that you've put together your box (with the top open and closing well), write a cute message! Since this is a Tiny Button Present, I wrote "You're as cute as a button!". You can always change up your message but I thought adding a tiny button with the message would make it extra cheesy. ;)


4. Here's the hardest part (also optional). I tied a small bow with string (kind of like miniature ribbon?) to pull the whole button idea together.


Here's what my Tiny Button Present looks like!


What I've learned:

- Make sure your initial cuts match up with one another, so your box comes out even on all sides.
- Tying string around a tiny box is a lot harder than you would think!


I made this Tiny Button Present for my boyfriend and hid it in his apartment when I visited him, so that he could find it after I left! (Oh the things I do to make a long distance relationship work :P) If you're considering making this for someone special, you should do it! :)

Hope you enjoyed this blog post and I promise there will be more to come soon!


Alison :)


PS - If you have a funny "back-side" joke for me, comment below!