Friday, November 22, 2013

Chinese Wontons (Homemade)

Hey everyone,

I have to tell you working really takes up a little too much time for my taste. I would much rather be crafting and blogging and I realize I have been a bad blogger. None the less, I hope you enjoy this post and try making some of your own wontons!


Materials:
- 1 Pound Ground Pork
- Scallions
- Nappa Cabbage
- 2 Wonton skins packs (square, and defrosted)
- Chopping board and knife
- Mixing bowl
- Large Plate
- Seasame oil
- and Egg


These are the items I used, but you can change around the ingredients!


Steps:

1. Wash your hands and get excited to make some wontons! First, chop up your veggies. For me, I chopped around half of my small nappa cabbage, and 2 stalks of scallion.


2. Mix your ground pork and veggies together in a large mixing bowl.

3. Beat up an egg and mix that into the wonton filling mixture. This egg will help cheap everything togeher! You can also drop in som seasme oil for some of the extra flavor. A little goes a long way. :)


4. Now you can start foling in you wonton filling into those wonton skins! I used about 2 packs of wonton skins, but depending on how much filling you want to use for each wonton, you may use more or less. The trick is to use all the filling and the skins without leftovers!


5. Now, boil your homemade wontons for about 10 min and set the table for a nice, balanced meal! (There are meat and veggies in there!)


What I've learned:

- Make sure your wonton skins have defrosted all the way.
- Chop the vegetables as finely as you can, I enjoy "hiding" the vegetables in my wontons, so you won't have a crunch when you're eating.


I really like making wontons because you know it's healthy, you can trick yourself (and family) into eating vegetables without them really knowing (or caring, because they're that good!) Usually I'd make a soup base (I threw some of that extra nappa cabbage into the soup), but you can serve them on a plate and have dipping sauces as well.


I hope you enjoy your meals!!


Alison :)


Friday, June 28, 2013

Curling Hair with a Curling Wand Tutorial

Hi everyone! Today's post is for all my ladies out there (and for any men that are curious and want to try this too). I've been asked how I curl my hair a few times by friends and co-workers so I figured I'd share it with you! I have very straight, thick hair so I'm sure that this can work for anyone! Keep on reading for how to curl your hair with a curling wand.
 
Materials:

- Curling Wand
- Brush/comb
- Hairspray 
- Hair Clips
- Heat Protecting spray or serum


 Here's are pictures of me before and after I curled my hair:


                                                 Before                                               After


Steps:

1. First plug in your curling wand. While it heats up, brush your hair so that there aren't any knots or tangles and prep your hair with heat protecting sprays or serums. You should also take time to part your hair. I part my hair to the side, but you have a center part that's no problem! I would also part your hair in the back and clip it to one side. Depending on how thick your hair is and how much hair you have, take the top section of your hair and clip it as well (I'll be doing this ^.^). 


2. Now we can start curling! Take a small section of hair and begin wrapping it around your wand so that your hair curls away from your face. It's important to know that the wand is a cone shape and should be held so that the larger width is at the top of the curled section. The smallest part of the wand should be at the ends of your hair.


3. Again, you should curl your hair away from your face, meaning your hair should go over and then under the curling wand as it wraps around. Here I've finished the first section! (I still have the other side and the top section of my hair to curl...)


 4. Now you can curl the other side. You will still be curling your hair away from your face, but since its on the side of your face, curl the "opposite" way. See pics below!


If you still have your hair clipped up (like me!) Go ahead and unclip, and curl both sides of the top as well.


5. Here's the fun part, hair spray! Flip, spary, flip, scrunch, comb!


I was having too much fun! (This tutorial = many #selfies...)


What I've learned:

- When you start curing the top sections, start curling a few inches down (not right at the top of your head). Otherwise you will end up with more of a "poodle" curl instead of looser, face-framing waves.
- If your curls aren't staying, try smaller sections each time you curl. With less hair, the heat will penetrate more of your hair and it will keep the hair curly longer.
- Be careful not to burn yourself!


My good friend actually showed me how to curl my hair so I hope this helps all of you who had trouble before! My hair is very stubborn but it seems to like Curling Wands! You can try and experiment with your Curling Wand by making tighter and looser curls, for an even more natural look! 

I love changing up my hairstyle and I'm sure you guys do too!


Thanks for stopping by :)


Monday, April 1, 2013

Cooking Pasta Faster

Hey everyone! I realize it's been a really long time since I've posted (just been very busy sadly) but when  I learned about this neat trick to cooking pasta faster, I had to share it with you! If you live a fast paced lifestyle, or you're just really hungry and can't wait to eat (or both hehe) then this can definitely help. If you are as impatient as me and you love pasta, keep reading!

Materials:

- Stove 
- Water
- Sautรฉ Pan, or any large flat pan (non stick)
- Pasta (I usually go with Angel hair since its has the thinnest width and therefore cooks faster!)
- Strainer
- Wooden spoon/Spatula


Additional ingredients I used (just incase you were curious):

- Sausages (pre-cooked)
- Fresh chopped garlic
- Spinach
- Chopped onions
- Olive Oil 
- Chicken Broth
- Salt and pepper


I used to always boil water in a large pot to make pasta, but with Angle hair and other long pastas's, it's a lot faster to boil the water in a pan! There's not only less water to heat up but there also more surface area over the burner to heat the pan.


 Steps:

 1.  Lay your pasta in the pan and turn on the stove to high heat. Right after, pour in your cold/room temp water. You don't need to wait for the water to boil before putting in the pasta!


2. Stir your pasta every once in awhile. While your pasta's cooking, cook your other ingredients on the side so that they'll be done at the same time.


3. Strain out the water in your pasta and mix it in with your already prepared ingredients! At this point, I would add a little more olive oil so the pasta doesn't stick to each other.


Voilรก! 

Dinner is done, fast and easy! I added a litle shredded cheese to mine to bring it all together ;). I hope you enjoyed this post and try it out for yourselves! I thought this was a great way to cook pasta and it (atleast feels like) is much faster than waiting for my big ole' pot of water to boil.

For us busy people, time spent is time I could've been laying on the couch!


Alison

Wednesday, February 13, 2013

Heart Accent Nail

Hi everyone! I wanted to post this before Valentine's Day incase you wanted to get a little festive but didn't know how! I'm going to show you an easy way to paint an Heart Accent Nail. Hope you like it! ^.^

Materials:

- 2 shades of nail polish (I used grey and pink!)
- Tape
- Scissors


Steps:

1. First paint your base color on your nails like you normally would. I used a subdued grey color as a base, but you could use red or pink if you wanted to really jazz up your finger nails for Valentine's Day!


2. Once your nails are dry, take a piece of tape and fold it in half. Keep in mind you'll have to be able to pull it apart though!


3. Now cut half a heart onto the folded part of your tape. Then open up your tape to find a heart shape cut out! I love this because there is no need for you to go out and buy a scrapbooking "heart hole punch", unless you have one already...


4. Tape that piece of tape over the nail you want to accent. With your accent color (I used pink), paint over the heart. If it gets on the tape no worries! I ended up putting it on my index finger nail on one hand and the ring finger nail on my other hand! Trying to keep things exciting, hehe.


5. Take the tape off and voila! a perfect Heart Accent!


What I've learned:

- Make sure your base color is completely dry! The tape could peel some of it off if you didn't wait long enough.
- When you fold your tape in half, fold it off center so that it'll be easier to pull it apart.
- When you paint the heart, try to use minimal nail polish. if you gob it on, it might smear when you take off the tape.


I am by no means a Nail Guru (a beginner if anything!) and I think this is a great step to trying much more elaborate details. I'm going to keep trying to improve and show you more quick and easy ways to "pretty up" your nails! I really like how my nails turned out and I hope you like this simple techinque too! :)


Happy almost Valentine's Day!


Alison

Saturday, January 19, 2013

Adjustable Necklace Knot Tying

Hey everyone! For those of you who enjoy making your own jewelry specifically necklaces and bracelets, this might be able to help you! This is super easy to do so I hope you try it out!

Materials:
- Bead/beads
- String


I love that this can make the simplest jewelry a little more versatile!


Steps:

1. Tie a simple "Overhand Knot" with one end of your string to the other end.


2. With your loose end, do the same thing on the other end of the string (that you just tied). You should be able to move the knots along the string! This allows you to adjust the length of your jewelry!


Great! Here's what your necklace/jewelry should look like:


What I've learned:

- Make sure you use the right kind of rope or string. You don't want anything easily frayed or roughed up!


This is great for simple necklaces and bracelets! I really like that you can wear the necklace long or short depending on your outfit. I hope you enjoyed this post and that you use it too! :)

Keep on crafting!

Alison

Sunday, January 13, 2013

DIY Corner Bookmark

Hi everyone! I know it's been awhile and I promise to try my best to blog more! I've bee doing a lot more reading on my commute to work and decided to make myself a simple, yet functional bookmark! This corner bookmark is super easy to make and you can really personalize it and make it your own. Keep on reading to see how to make one! :)


Materials:
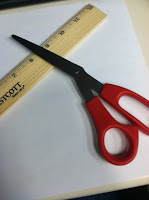
- Ruler
- Scissors
- Paper
-Tape/glue
- Markers, pens, pencils etc.


I used a plain sheet of paper but you can use cardstock or construction paper of any color to personalize your bookmark! Make it really fun!


Steps:

1. Using my ruler, I cut the sheet of paper down into a 5x5 square. Then I trimmed the edges so that they were even on both sides, like in the picture below.


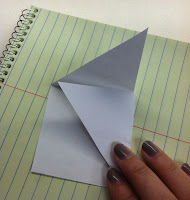
2. Now (this gets a little weird to descibe), cut what would be a small square out of one side of your paper. You should have an "arrow" shape now!


3. Fold the two ends of your "arrow" down so that you have a small square! After the second flap, take some tape or glue to secure it in place. Double sided tape works well or roll up your tape so that you won't be able to see it.


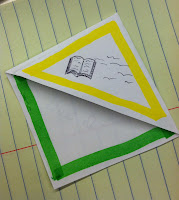
4. Decorate and personalize your bookmark! I wanted to keep mine fairly simple but decided to write a quote about reading on the back. Cheesy, I know... :)


Here's my Corner Bookmark!


What I've learned:

- Mark your measurements down in pencil lightly. They help a lot and you can go back to erase them.
- Whie plain paper works pretty well, I think using cardstock would be better especially if you want your bookmark to last you a long time.


I've recently started reading a lot more books which is actually part of my New Year's Resolution so this DIY Corner Bookmark project was great! I hope you liked this simple craft and that you try it out for yourself. What books are you guys reading and do you have any recommendations?


Alison :)