Tuesday, December 18, 2012

DIY Paper Gift Bow

Happy holidays everyone! 'Tis the season to be crafting! I tried making my own Paper Gift Bow this year because it's not only cheap but you can reuse paper that you were going to throw away anyways. Hope you get a chance to make some for this gift giving season!


Materials:
- Sheet of paper
- Scissors
- Tape
- Stapler


Steps:

1. Cut your paper strips out! You will need:

- 3 long strips/width of the sheet of paper (mine was 8.5 inches)
- 3 shorter strips (7.5 inches)
- 3 even shorter strips (6.5 inches)
- 1 very short strip (2.5 inches)

Depending on the size you want to make your bow, change up the measurements. Also the wider the strips the more difficult it might be to twist, so keep that in mind!


2. Take each strip and twist both sides so that the ends meet in the middle. Do each side one at a time and tape it so they won't move. Leave that little piece for later. Hopefully my pictures will help!

<<<<<<<<<                     >>>>>>>>>


3. After you make all your pieces, put together each layer (of 3 pieces of the same size) so that they kind of make a 6 petaled flower. Then staple all of them together. Largest one on the bottom, with the other two on top. Take the smallest strip and make a loop, holding together with tape. This will be in the middle of the bow, covering the staple. ;) Don't know if I'm making sense but I'm trying to... Pictures always help!


Here's my first Paper Gift Bow!


What I've learned:

-You can have pointy corners or rounded ones depending on how tightly you decide to twist your paper strips before taping them.
- I tried to twist them together more so that the corners would be pointy!
- Card stock might be a good alternative to paper if you want a "tougher" bow.


Why not recycle and save money at the same time! Added bonus: impress your relatives with you're crazy craftin' skills!


I liked this project so much! I want to try making similar stuff especially around the holiday season! Stay tuned for more! 

Alison :)


Sunday, December 16, 2012

DIY Sparkly Peter Pan Collar

Hi everyone! Today's DIY project is one that I've been itching to do for awhile now... a removable Peter Pan collar! I decided I wanted to make a super sparkly piece of statement jewelry for New Years and here's what I came up with. This project is a little more time consuming but it is totally worth it! Keep reading to see what I did and try it out for yourself! :)


Materials:
- Glue                          
- Magazine/scrap paper                          
- Small beads
- Ribbon
- Pen
- Felt 
- Scissors                       I chose colors that I thought could be versatile,
- Corkscrew                                     but had a some glitz to it!


Steps:

1. Draw out a template on a piece of scrap paper. I folded mine in half, drew out one side of the collar and cut it out so that both sides would be the same. Using a pen, trace the paper cut-out onto your felt! Cut that out once you're done.


 2.  Now's the tricky part, take your glue and slowly glue on your beads. I did small sections at a time, spreading the glue and sprinkling the beads over it and filling in the spaces afterwards. During this step, make sure your beads are laying flat!


3. This part was actually a little difficult for me too. You have to decide how you want to fasten the collar around your neck. I went with ribbon! Using a corkscrew (resourceful maybe?), I poked 2 small holes to the trimmed ends of my collar. With one ribbon, I looped it through the 2 holes and tied it in a bow. This way, it'll still be adjustable!


Here's my finished Peter Pan Collar!


 What I've learned:

- Make sure you know the exact shape of your collar before cutting your felt. I even tried on the scrap paper version to make sure it was what I wanted.
- The ribbon as a fastener works well for me because I want to have the flexibility to change it to fit different shirts. You could also use one ribbon on either side to tie together, or a button if you want the collar to be fixed!
- Choose beads wisely! Make sure they're small enough to be glued on without falling off. Flattening all the beads on your collar will help make sure they won't get caught on anything.
- To get my ribbon through the "corkscrew holes" I used a twist tie as a threading tool!


I hope you liked this DIY project and make your own Peter Pan Collar! This project was a little more tedious (especially when I was getting beads stuck to my fingers from all the glue) than some of my other DIY's but the end result turned out a lot better than I had expected. What do you think?

I like my new Peter Pan Collar so much that I want to make another one! I should also buy more high collared/crew neck shirts... ^.^


Alison


Saturday, December 1, 2012

Christmas Center Piece

It's the first day of December and I'm sure many of you want to do crafts for the holidays! Today I'm going to be making a Christmas center piece. I'm probably going to put it on a bookshelf or side table just as a little Christmas cheer but I hope you like this and find a place for a mini Christmas tree!


Materials:
- Tin Foil
- One-sided sticky Green felt (from your local craft store)
- Birthday/party hat
- 1 empty toilet paper roll
- Tissue paper
- Glue
- Almond Hersey kisses (mostly for the gold foil, and a snack when you're crafting!)
- Newspaper/magazine (optional)


Steps:

1. First, take a toilet paper roll and glue it into your birthday hat. This is the base for your tree a.k.a. the tree trunk! Don't forget to take the birthday hat string off, hehe. I had some trouble getting it to stay, so I stuffed the tip of the hat with a balled up magazine page. ^.^


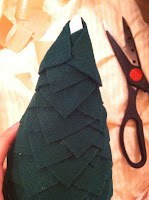
2. Now cut up your felt into squares/diamond shapes! With first few squares, lay them overlapping each other and so that the corners hang off the side. Because the felt has adhesive on the back already, I cut some small triangular pieces to stick onto the back so that there's no sticky parts exposed.


 3. Keep layering the felt squares up the tree until you get to the top. For the top of the tree, I took a square and cut 6 slits into it so that I could lay the square on the top of the tree and have the sides fold down smoothly.


4. Now I took some time to clean everything up a bit. Trim the bottom of your tree where parts of the birthday hat is showing. Make sure all your felt square are sticking and that your tree stump is still in place! After this step, you've got your Christmas tree ready, and all you have to do now is decorate it!


5. I kind of got crazy with scrounging around my apartment to find stuff to decorate my Christmas tree with... With some Hersey Kiss (Almond) wrappers, I made a star!


I used some tin foil to make "tinsel", and some rolled up tissue paper as small ornaments! Red tissue paper to stick with the Christmas theme. :)


 What I've learned:

- Making a star out of foil is a lot harder than you think! Layer each piece of foil on top of each other so that it won't fall apart.
- Get creative with your ornaments! I thought about using buttons too!
- Make sure you plan/place your felt squares strategically. I had to use every last bit to cover the party hat!


Here's my finished Christmas tree!
<<<


I hope you liked this post and are as excited for the holidays as I am! Now that I've decorated my mini tree, maybe I should get a my real Christmas tree and decorate it. I thought of this idea on my own (although I'm sure other people have done things similar to it), so let me know what you think!


Happy crafting!

Alison :)

Monday, November 26, 2012

Apple Pie Recipe

Hello everyone! To get in the holiday spirit, I thought I'd share a Apple pie recipe I tried. I'm not a chef by any means but this pie turned out really delicious! I hope you try it and enjoy eating it as much as I did, and don't forget the ice cream! :)

Materials and Ingredients: (makes 2 pies)
- 2, nine inch pie tins
- 10 apples
- Pie crust mix, 2 boxes (sorry, didn't want to be too ambitious!)
- Measuring cup
- 3/4 cup of sugar
- 1/2 tsp of nutmeg
- 1/2 tsp of cinnamon
- Rolling pin
- Mixing bowl
- Knife
- Vanilla ice cream


Steps:

1. Wash and cut your apples! If you're feeling extra enthusiastic, you can peel your apples too. The skin adds a little crunchy texture and it's also good for you though, which is why I kept it. Cut your apples into slices, and keep them on the side in a mixing bowl as you prepare the crust.


2. Now make the crust. Assuming you bought the crust like me... follow the box instructions! Hehe ^.^


3.  Roll out your dough (I don't have a rolling pin so I used a bottle!), so that it covers the pie tin. For the top half of the pie, I tried making strips of dough for a fancier looking pie. Since you can make 2 pies, try something different! At this point, you should preheat the oven to 425 degrees!


4. Now get back to your apples. Mix in the cinnamon, sugar and nutmeg! Once it's thoroughly mixed, put them in your covered pie tins.


5. Poke a few holes in the top of your pie crust (I got a little crazy with one of my pies... whoops!). Bake your pies in the oven at 425 degrees (your oven should be preheated!) for about 45 minutes or until your pie crust a little golden brown.


Check out my pies! Okay, so they don't look that great but the tasted good! Check out the giant tub of vanilla ice cream! YUM!


What I've learned:

- Pie making is super fun but time consuming!
- Make sure you preheat the oven.
- Buy vanilla ice cream beforehand.


I hope you guys enjoy you're pie! I want to start making more food and blogging about more recipes but we'll see how that goes. Thanks for reading, and stay tuned for more!


Alison